Summary: in this tutorial, you’ll learn about the JavaScript FileReader API and how to use it to implement the file upload.
Introduction to the JavaScript FileReader API
When you drag and drop files to the web browser or select files to upload via the file input element, JavaScript represents each file as a File object.
The File object allows you to access the selected file in JavaScript. And JavaScript uses the FileList object to hold the File objects.
To read the content of a file, you use the FileReader object. Note that the FileReader only can access the files you selected via drag & drop or file input.
To use the FileReader object, you follow these steps:
First, create a new FileObject:
const reader = new FileReader();Code language: JavaScript (javascript)Second, call one of the read methods to read the content of a file. For example:
reader.readAsDataURL(file);Code language: JavaScript (javascript)The readAsDataURL() method reads the content of the file, which you get from the FileList object.
The readAsDataURL() method returns an object with the result property that contains the data as a data: URL. The data:URL represents the file’s data as a base64 encoded string.
For example, you can use the readAsDataURL() to read an image and show its base64 encoded string on a webpage.
Besides the readAsDataURL() method, the FileReader has other methods for reading file’s data such as readAsText(), readAsBinaryString(), and readAsArrayBuffer().
Since all of these methods read the file’s data asynchronously, you cannot just return the result like this:
const data = reader.readAsDataURL(file);Code language: JavaScript (javascript)When the readAsDataURL() method completes reading the file successfully, the FileReader fires the load event.
Third, add an event handler to handle the load event of the FileReader object:
reader.addEventListener('load', (e) => {
    const data = e.target.result;
}Code language: JavaScript (javascript)
Using JavaScript FileReader to implement an image upload application
We’ll use the FileReader to implement an image upload application:
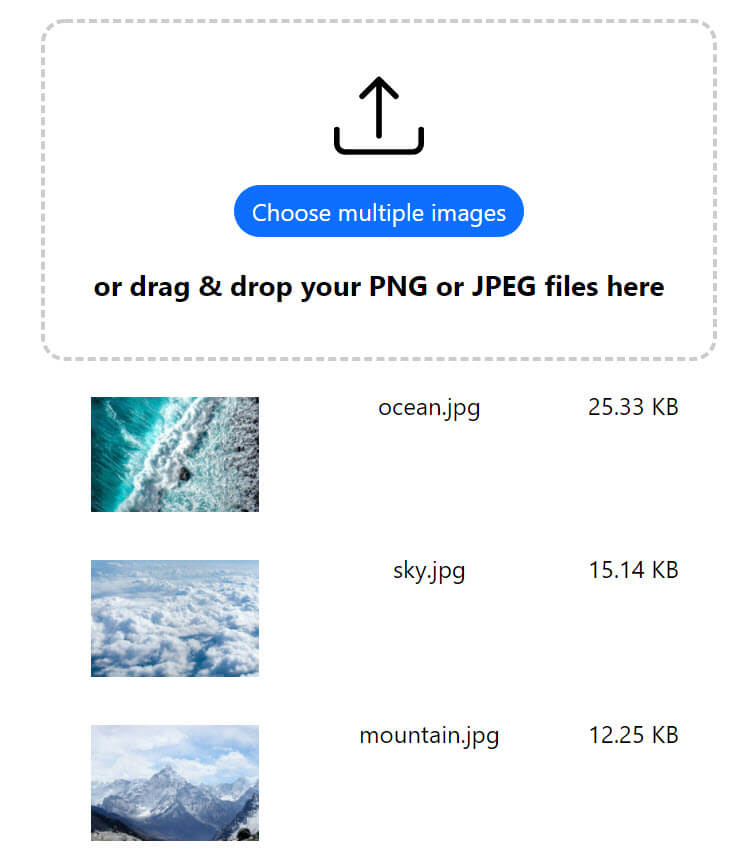
When you drag & drop images to the drop zone, the application will use the FileReader to read the images and show them on the page together with the filename and filesize:
Also, the application will use the Fetch API to upload the files to the server.
For the server-side, we’ll implement a simple PHP script that uploads the images to the 'uploads' folder on the server.
Setting up the project structure
First, create the following file and directory structure:
├── css
|  └── style.css
├── images
|  └── upload.svg
├── js
|  └── app.js
├── index.html
├── upload.php
└── uploadsCode language: JavaScript (javascript)
index.html
The following shows the index.html file:
<!DOCTYPE html>
<html lang="en">
<head>
<meta charset="UTF-8" />
<meta name="viewport" content="width=device-width, initial-scale=1.0" />
<link rel="stylesheet" href="css/style.css" />
<title>FileReader API Demo - Image Upload Application</title>
</head>
<body>
<main>
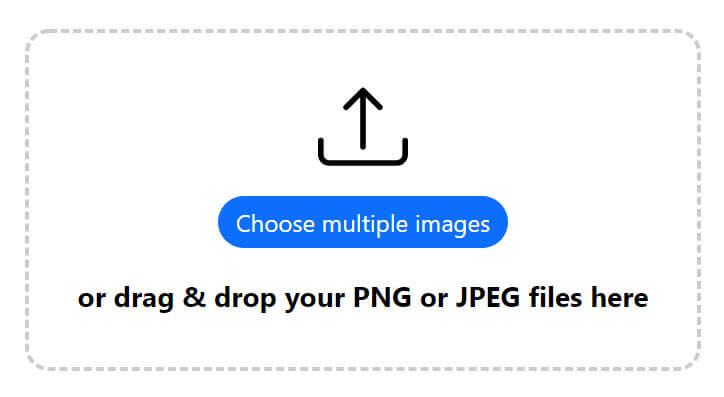
<div class="dropzone">
<img src="images/upload.svg" alt="upload" width="60" />
<input type="file" class="files" id="images"
accept="image/png, image/jpeg"
multiple />
<label for="images">Choose multiple images</label>
<h3>or drag & drop your PNG or JPEG files here</h3>
</div>
<div class="image-list"></div>
</main>
<script src="js/app.js"></script>
</body>
</html>Code language: JavaScript (javascript)In the index.html, we add the css/style.css to the head of the html document and js/app.js before the enclosing body tag.
The div element with the class dropzone allows you to drag and drop images into it. Also, the file input element will enable you to select files to upload.
The file input element accepts multiple files and only allows jpeg and png images:
<input type="file" class="files" id="images"
    accept="image/png, image/jpeg"
    multiple />Code language: JavaScript (javascript)
The style.css provides the styles that transform the file input element into a button. Also, it has the active class that highlights the dropzone when you drag the file into it.
The div element with the image-list class will show the uploaded images.
app.js
First, select dropzone, file input (files), and image list elements using the querySelector() method:
const imageList = document.querySelector('.image-list');
const fileInput = document.querySelector('.files');
const dropzone = document.querySelector('.dropzone');Code language: JavaScript (javascript)
Second, define a function that adds the active class to or remove it from the dropzone:
const setActive = (dropzone, active = true) => {
    const hasActiveClass = dropzone.classList.contains('active');

    if (active && !hasActiveClass) {
        return dropzone.classList.add('active');
    }

    if (!active && hasActiveClass) {
        return dropzone.classList.remove('active');
    }
};Code language: JavaScript (javascript)
If you call setActive(dropzone), it’ll add the active class to the dropzone. If you call setActive(dropzone, false), it’ll remove the active class from the dropzone.
Third, highlight the dropzone when the dragenter and dragover events occur and remove the highlight when the dragleave and drop events occur:
dropzone.addEventListener('dragenter', (e) => {
    e.preventDefault();
    setActive(dropzone);
});

dropzone.addEventListener('dragover', (e) => {
    e.preventDefault();
    setActive(dropzone);
});

dropzone.addEventListener('dragleave', (e) => {
    e.preventDefault();
    setActive(dropzone, false);
});

dropzone.addEventListener('drop', (e) => {
    e.preventDefault();
    setActive(dropzone, false);
    // ..
});Code language: JavaScript (javascript)
Fourth, get the FileList object in the e.target as e.target.files in the drop event handler of dropzone:
dropzone.addEventListener('drop', (e) => {
    e.preventDefault();
    setActive(dropzone, false);
    // get the FileList
    const { files } = e.dataTransfer;
    handleImages(files);
});Code language: JavaScript (javascript)
In the drop event handler, we use object destructuring to get the FileList object and call the handleImages() function to handle the uploaded images:
Fifth, define the handleImages() function:
const handleImages = (files) => {
    // get valid images
    let validImages = [...files].filter((file) =>
        ['image/jpeg', 'image/png'].includes(file.type)
    );
    //  show the image
    validImages.forEach(showImage);

    // upload all images
    uploadImages(validImages);
};Code language: JavaScript (javascript)
The handleImages() function gets the valid images, shows each valid image on the page using the showImage() function and uploads all the images to the server using the uploadImages() function.
Sixth, define the showImage() function that shows each image in the validImages array:
const showImage = (image) => {
    const reader = new FileReader();
    reader.readAsDataURL(image);
    reader.addEventListener('load', (e) => {
        const div = document.createElement('div');
        div.classList.add('image');
        div.innerHTML = `
            <img src="${e.target.result}" alt="${image.name}">
            <p>${image.name}</p>
            <p>${formatBytes(image.size)}</p>
        `;
        imageList.appendChild(div);
    });
};Code language: JavaScript (javascript)
The showImage() uses the FileReader to read the uploaded image as the data URL. Once the FileReader completes reading the file, it’ll create a new div element to hold the image information.
Note that the formatBytes() function converts the size in bytes into a human-readable format:
function formatBytes(size, decimals = 2) {
    if (size === 0) return '0 bytes';
    const k = 1024;
    const dm = decimals < 0 ? 0 : decimals;
    const sizes = ['Bytes', 'KB', 'MB', 'GB', 'TB', 'PB', 'EB', 'ZB', 'YB'];
    const i = Math.floor(Math.log(size) / Math.log(k));
    return parseFloat((size / Math.pow(k, i)).toFixed(dm)) + ' ' + sizes[i];
}Code language: JavaScript (javascript)
Seventh, define the uploadImages() function that uploads all images to the server:
const uploadImages = async (images) => {

    const formData = new FormData();

    [...images].forEach((image) =>
        formData.append('images[]', image, image.name)
    );

    const response = await fetch('upload.php', {
        method: 'POST',
        body: formData,
    });

    return await response.json();
};Code language: JavaScript (javascript)
The uploadImages() function uses the FormData API to construct data for submission:
const formData = new FormData();Code language: JavaScript (javascript)For each image, we add it to the FormData object:
[...images].forEach((image) =>
    formData.append('images[]', image, image.name)
);Code language: JavaScript (javascript)
Note that the images variable is a FileList object, not an array. To use the forEach() method, you use the spread operator (...) to convert the FileList object to an array like this:
[...images]Code language: JavaScript (javascript)All key/value pairs in the form data have the same key as images[]; in PHP, you can access it as an array ($_FILES['images'])
The uploadImages() function uses the Fetch API to upload the images (as the FormData object) to the server:
const response = await fetch('upload.php', {
    method: 'POST',
    body: formData,
});

return await response.json();Code language: JavaScript (javascript)
Eighth, add the change event handler to the file input element if users select files using this input element:
fileInput.addEventListener('change', (e) => {
    const { files } = e.target;
    handleImages(files);
});Code language: JavaScript (javascript)
In the change event handler, you can access the FileList object as e.target.files. The logic for showing and uploading images is the same as drag & drop.
Note that if you drag & drop images outside the dropzone, the web browser will display the images by default.
To prevent this, you call the preventDefault() method of the dragover and drop event objects of the document like this:
// prevent the drag & drop on the page
document.addEventListener('dragover', (e) => e.preventDefault());
document.addEventListener('drop', (e) => e.preventDefault());Code language: JavaScript (javascript)
The following shows the complete app.js file:
const imageList = document.querySelector('.image-list');
const fileInput = document.querySelector('.files');
const dropzone = document.querySelector('.dropzone');

const setActive = (dropzone, active = true) => {
    // active class
    const hasActiveClass = dropzone.classList.contains('active');

    if (active && !hasActiveClass) {
        return dropzone.classList.add('active');
    }

    if (!active && hasActiveClass) {
        return dropzone.classList.remove('active');
    }
};

dropzone.addEventListener('dragenter', (e) => {
    e.preventDefault();
    setActive(dropzone);
});

dropzone.addEventListener('dragover', (e) => {
    e.preventDefault();
    setActive(dropzone);
});

dropzone.addEventListener('dragleave', (e) => {
    e.preventDefault();
    setActive(dropzone, false);
});

dropzone.addEventListener('drop', (e) => {
    e.preventDefault();
    setActive(dropzone, false);
    // get the valid files
    const { files } = e.dataTransfer;
    // hand images
    handleImages(files);
});

const handleImages = (files) => {
    // get valid images
    let validImages = [...files].filter((file) =>
        ['image/jpeg', 'image/png'].includes(file.type)
    );
    //  show the image
    validImages.forEach(showImage);
    // upload files
    uploadImages(validImages);
};

const showImage = (image) => {
    const reader = new FileReader();
    reader.readAsDataURL(image);
    reader.addEventListener('load', (e) => {
        const div = document.createElement('div');
        div.classList.add('image');
        div.innerHTML = `
            <img src="${e.target.result}" alt="${image.name}">
            <p>${image.name}</p>
            <p>${formatBytes(image.size)}</p>
        `;
        imageList.appendChild(div);
    });
};

const uploadImages = async (images) => {
    const formData = new FormData();

    [...images].forEach((image) =>
        formData.append('images[]', image, image.name)
    );

    const response = await fetch('upload.php', {
        method: 'POST',
        body: formData,
    });

    return await response.json();
};

function formatBytes(size, decimals = 2) {
    if (size === 0) return '0 bytes';
    const k = 1024;
    const dm = decimals < 0 ? 0 : decimals;
    const sizes = ['Bytes', 'KB', 'MB', 'GB', 'TB', 'PB', 'EB', 'ZB', 'YB'];

    const i = Math.floor(Math.log(size) / Math.log(k));

    return parseFloat((size / Math.pow(k, i)).toFixed(dm)) + ' ' + sizes[i];
}

fileInput.addEventListener('change', (e) => {
    const { files } = e.target;
    handleImages(files);
});

// prevent the drag & drop on the page
document.addEventListener('dragover', (e) => e.preventDefault());
document.addEventListener('drop', (e) => e.preventDefault());Code language: JavaScript (javascript)
Finally, create a simple upload.php script that moves the uploaded images to the uploads folder:
<?php

const APP_ROOT = 'http://localhost:8080/';

const UPLOAD_DIR = __DIR__ . '/uploads';

const MESSAGES = [
    UPLOAD_ERR_OK => 'File uploaded successfully',
    UPLOAD_ERR_INI_SIZE => 'File is too big to upload',
    UPLOAD_ERR_FORM_SIZE => 'File is too big to upload',
    UPLOAD_ERR_PARTIAL => 'File was only partially uploaded',
    UPLOAD_ERR_NO_FILE => 'No file was uploaded',
    UPLOAD_ERR_NO_TMP_DIR => 'Missing a temporary folder on the server',
    UPLOAD_ERR_CANT_WRITE => 'File is failed to save to disk.',
    UPLOAD_ERR_EXTENSION => 'File is not allowed to upload to this server',
];

const ALLOWED_FILES = [
    'image/png' => 'png',
    'image/jpeg' => 'jpg'
];

const MAX_SIZE = 5 * 1024 * 1024; //  5MB

const HTTP_STATUSES = [
    200 => 'OK',
    400 => 'Bad Request',
    404 => 'Not Found',
    405 => 'Method Not Allowed'
];


$is_post_request = strtolower($_SERVER['REQUEST_METHOD']) === 'post';
$has_files = isset($_FILES['images']);

if (!$is_post_request || !$has_files) {
    response(405, [
        'success' => false,
        'message' => ' Method not allowed or files do not exist'
    ]);
}

$files = $_FILES['images'];
$file_count = count($files['name']);

// validation
$errors = [];
for ($i = 0; $i < $file_count; $i++) {
    // get the uploaded file info
    $status = $files['error'][$i];
    $filename = $files['name'][$i];
    $tmp = $files['tmp_name'][$i];

    // an error occurs
    if ($status !== UPLOAD_ERR_OK) {
        $errors[$filename] = MESSAGES[$status];
        continue;
    }
    // validate the file size
    $filesize = filesize($tmp);

    if ($filesize > MAX_SIZE) {
        // construct an error message
        $message = sprintf(
            "The file %s is %s which is greater than the allowed size %s",
            $filename,
            format_filesize($filesize),
            format_filesize(MAX_SIZE)
        );

        $errors[$filesize] = $message;
        continue;
    }

    // validate the file type
    if (!in_array(get_mime_type($tmp), array_keys(ALLOWED_FILES))) {
        $errors[$filename] = "The file $filename is allowed to upload";
    }
}

if ($errors) {
    response(400, [
        'success' => false,
        'message' => $errors
    ]);
}

// move the files
for ($i = 0; $i < $file_count; $i++) {
    $filename = $files['name'][$i];
    $tmp = $files['tmp_name'][$i];
    $mime_type = get_mime_type($tmp);

    // set the filename as the basename + extension
    $uploaded_file = pathinfo($filename, PATHINFO_FILENAME) . '.' . ALLOWED_FILES[$mime_type];
    // new filepath
    $filepath = UPLOAD_DIR . '/' . $uploaded_file;

    // move the file to the upload dir
    $success = move_uploaded_file($tmp, $filepath);
    if (!$success) {
        $errors[$filename] = "The file $filename was failed to move.";
    }
}

if ($errors) {
    response(400, [
        'success' => false,
        'message' => $errors
    ]);
}

response(200, [
    'success' => true,
    'message' => 'The files uploaded successfully'
]);


/**
 * Return a mime type of file or false if an error occurred
 *
 * @param string $filename
 * @return string | bool
 */
function get_mime_type(string $filename)
{
    $info = finfo_open(FILEINFO_MIME_TYPE);
    if (!$info) {
        return false;
    }

    $mime_type = finfo_file($info, $filename);
    finfo_close($info);

    return $mime_type;
}

/**
 * Return a human-readable file size
 *
 * @param int $bytes
 * @param int $decimals
 * @return string
 */
function format_filesize(int $bytes, int $decimals = 2): string
{
    $units = 'BKMGTP';
    $factor = floor((strlen($bytes) - 1) / 3);

    return sprintf("%.{$decimals}f", $bytes / pow(1024, $factor)) . $units[(int)$factor];
}

/**
 * Response JSON to the client
 * @param int $status_code
 * @param array|null $data
 */
function response(int $status_code, array $data = null)
{
    header("HTTP/1.1 " . $status_code . " " . HTTP_STATUSES[$status_code]);
    header("Content-Type: application/json");
    echo json_encode($data);
    exit;
}
Code language: JavaScript (javascript)
Read more on how to upload multiple files in PHP for more information.
Summary
- Use the JavaScript FileReader API to read the files selected by users via drag & drop or file input element.