Summary: in this tutorial, you’ll learn how to use the JavaScript Notification API to show desktop notifications to the users.
The Notification API allows you to use JavaScript to display desktop notifications to the users.
Notification permissions
Since the Notification API can be easy to abuse, it strictly enforces two security features by default:
- First, users must explicitly agree to receive the notifications on a per-origin basis.
- Second, only code that runs in a secure context (HTTPS) can send the notifications.
When you request users for notification permission, they may agree or deny it.
If users deny it explicitly, the browsers will remember the choice. And you have no second chance to request permission again.
If users don’t agree or refuse i.e., they ignore it, you can send a request for the notification permission again.
To request notification permission, you use the Notification global object. This object has the requestPermission() method that returns a Promise, which resolves when the user takes an action on the permission dialog box:
let permission = await Notification.requestPermission();Code language: JavaScript (javascript)The permission can be one of the following string 'granted', 'denied', or 'default':
'granted'– users accept to receive the notifications.'denied'– users deny having the notifications.'default'– users choices are unknown and browsers will act as if the values were'denied'.
Show and hide notifications
To create a notification, you use the Notification constructor. The following creates a simple notification with a title:
const greeting = new Notification('Hi, How are you?');Code language: JavaScript (javascript)The notification can be highly customizable with the second options parameter.
For example, the following creates and shows a notification with body text with an icon:
const greeting = new Notification('Hi, How are you?',{
  body: 'Have a good day',
  icon: './img/goodday.png'
});Code language: JavaScript (javascript)
To close a notification, you call the close() method of the Notification object returned from the Notification constructor:
greeting.close();Code language: CSS (css)To close the notification after a period of time, you use the setTimeout() function. For example, the following shows how to close the greeting notification after 10 seconds:
setTimeout(() => greenting.close(), 10*1000);Code language: JavaScript (javascript)Notification events
The Notification object provides you with the following events:
show– is fired when the notification is displayed.click– is fired when the notification is clicked.close– is fired when the notification is dismissed or closed via theclose()method.error– is fired when an error occurs, which blocks the notification from being displayed.
To handle these events, you use the addEventListener() method of the Notification object.
The following example navigates to the URL https://www.javascripttutorial.net/ when the notification is clicked:
// create a notification object
const greeting = new Notification('Hi, How are you?',{
  body: 'Have a good day',
  icon: './img/goodday.png'
});

// navigate to the https://www.javascripttutorial.net/ on click
greeting.addEventListener('click', function(){
    window.open('https://www.javascripttutorial.net/web-apis/javascript-notification/');
});Code language: JavaScript (javascript)
Besides using the addEventListener(), you can assign an event handler to the onclick property of the Notification object. For example:
greeting.onclick = () => window.open('https://www.javascripttutorial.net/web-apis/javascript-notification/');Code language: JavaScript (javascript)The Notification object has onshow, onclick, onclose and onerror for the corresponding events.
JavaScript Notification API example
In this example, we’ll build a simple web application that shows a desktop notification to the users.
Create the project structure
First, create a new folder called notification, and three subfolders js, css, and img inside the notification folder.
Second, create style.css in the css folder, app.js in the js folder, and index.html in the notification folder.
Third, download and copy the following icon to the img folder. You’ll use it as the icon of the notification.

Create the index.html page
In the index.html page, you place the links to the style.css and app.js files:
<!DOCTYPE html>
<html lang="en">
<head>
    <meta charset="UTF-8">
    <meta name="viewport" content="width=device-width, initial-scale=1.0">
    <title>JavaScript Notification API</title>
    <link rel="stylesheet" href="css/style.css">
</head>
<body>
    <div class="container">
        <h1>JavaScript Notification API Demo</h1>
        <div class="error"></div>
    </div>
    <script src="js/app.js"></script>
</body>
</html>Code language: HTML, XML (xml)
The index.html has a heading one and a <div> element that will show an error message if the notification permission is not granted.
Make the app.js file
Since you’ll use the await keyword for calling the Notification.requestPermission() method, you need to place all the code in the app.js in an async IIFE:
(async () => {
   // place js code here
})();Code language: JavaScript (javascript)
First, define a function that creates and shows a notification, closes it after 10 seconds, and opens the URL (https://www.javascripttutorial.net/web-apis/javascript-notification/) if it is clicked:
// create and show the notification
const showNotification = () => {
    // create a new notification
    const notification = new Notification('JavaScript Notification API', {
        body: 'This is a JavaScript Notification API demo',
        icon: './img/js.png',
        vibrate: true
    });

    // close the notification after 10 seconds
    setTimeout(() => {
        notification.close();
    }, 10 * 1000);

    // navigate to a URL
    notification.addEventListener('click', () => {
        window.open('https://www.javascripttutorial.net/web-apis/javascript-notification/', '_blank');
    });
}Code language: JavaScript (javascript)
Second, define another function to show an error message if the notification is not granted:
// show an error message
const showError = () => {
    const error = document.querySelector('.error');
    error.style.display = 'block';
    error.textContent = 'You blocked the notifications';
}Code language: JavaScript (javascript)
Third, check if the notification permission is granted. If the user did not take any action, request it.
If the notification permission is granted, then the granted flag is true. Otherwise, it’s false. The showNotification() or showError() function is called based on the value of the granted flag:
let granted = false;

if (Notification.permission === 'granted') {
    granted = true;
} else if (Notification.permission !== 'denied') {
    let permission = await Notification.requestPermission();
    granted = permission === 'granted' ? true : false;
}

// show notification or the error message
granted ? showNotification() : showError();Code language: JavaScript (javascript)
The following shows the complete code of the app.js file:
(async () => {
    // create and show the notification
    const showNotification = () => {
        // create a new notification
        const notification = new Notification('JavaScript Notification API', {
            body: 'This is a JavaScript Notification API demo',
            icon: './img/js.png'
        });

        // close the notification after 10 seconds
        setTimeout(() => {
            notification.close();
        }, 10 * 1000);

        // navigate to a URL when clicked
        notification.addEventListener('click', () => {

            window.open('https://www.javascripttutorial.net/web-apis/javascript-notification/', '_blank');
        });
    }

    // show an error message
    const showError = () => {
        const error = document.querySelector('.error');
        error.style.display = 'block';
        error.textContent = 'You blocked the notifications';
    }

    // check notification permission
    let granted = false;

    if (Notification.permission === 'granted') {
        granted = true;
    } else if (Notification.permission !== 'denied') {
        let permission = await Notification.requestPermission();
        granted = permission === 'granted' ? true : false;
    }

    // show notification or error
    granted ? showNotification() : showError();

})();Code language: JavaScript (javascript)
Here is the demo page.
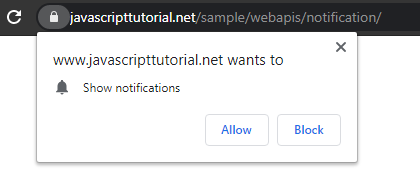
When you open the page, it’ll request notification permission:
If you click the allow button, you’ll see the following notification on your desktop:
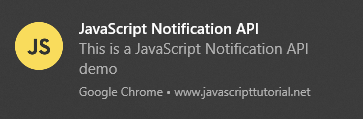
It’ll close in 10 seconds. If you click the notification, it’ll open the URL https://www.javascripttutorial.net/web-apis/javascript-notification/
Summary
- The JavaScript Notification API allows you to show desktop notifications to users.
- The notifications must be explicitly granted by users on an origin basis and only be triggered by the code executing in a secure context (
https). - Use the
Notificationconstructor to create and show notifications. - Use the
Notificationevents to make the notifications more interactive.