Summary: in this tutorial, you’ll learn how to use the JavaScript fillRect() method to draw rectangles with a specified width and height on a canvas.
Introduction to the JavaScript fillRect() method
The fillRect() is a method of the 2d drawing context object. The fillRect() method allows you to draw a filled rectangle at (x,y) position with a specified with and height on a canvas.
The following shows the syntax of the fillRect() method:
ctx.fillRect(x,y,width,height);Code language: CSS (css)In this syntax:
xis the x-axis coordinate of the starting point of the rectangle.yis the y-axis coordinate of the starting point of the rectangle.widthis the rectangles’ width. It can be positive or negative. The positive values are to the right while the negative values are to the left.heightis the rectangle’s height. It can be also positive or negative. The positive values are down while the negative values are up.
The fillStyle attribute of the 2d drawing context will determine the fill style of the rectangle.
JavaScript fillRect() example
The following shows the index.html file that has a canvas element:
<!DOCTYPE html>
<html lang="en">

<head>
    <meta charset="UTF-8">
    <meta name="viewport" content="width=device-width, initial-scale=1.0">
    <title>JavaScript Canvas fillRect</title>
    <link rel="stylesheet" href="css/style.css">
</head>

<body>

    <h1>JavaScript Canvas fillRect</h1>

    <canvas id="canvas" height="400" width="500">
    </canvas>

    <script src="js/index.js"></script>

</body>

</html>Code language: HTML, XML (xml)
The following drawRectangles() function in the app.js file will draw two rectangles:
function drawRectangles() {
    const canvas = document.querySelector('#canvas');

    if (!canvas.getContext) {
        return;
    }

    const ctx = canvas.getContext('2d');

    ctx.fillStyle = '#F9DC5C';
    ctx.fillRect(100, 100, 150, 100);

    ctx.fillStyle = 'rgba(0,0,255,0.5)';
    ctx.fillRect(200, 150, -150, -100);
}

drawRectangles();Code language: JavaScript (javascript)
How it works.
First, select the canvas element using the document.querySelector() method:
const canvas = document.querySelector('#canvas');
Code language: JavaScript (javascript)
Second, check if the browser supports the canvas API:
if (!canvas.getContext) {
    return;
}Code language: JavaScript (javascript)
Third, get the 2d drawing context object:
const ctx = canvas.getContext('2d');Code language: JavaScript (javascript)Fourth, set the fill style to the #F9DC5C color and draw the first rectangle using the fillRect() method:
ctx.fillStyle = '#F9DC5C';
ctx.fillRect(100, 100, 150, 100);Code language: JavaScript (javascript)
The first rectangle starts at (100,100) and has the width of 150 pixels and the height of 100 pixels.
Finally, set the fill style to blue with the alpha 0.5, which creates a transparent effect. And use the fillRect() method to draw the second rectangle:
ctx.fillStyle = 'rgba(0,0,255,0.5)';
ctx.fillRect(200, 150, -150, -100);Code language: JavaScript (javascript)
The second rectangle starts at (200,150). Since we passed the negative width and height to the fillRect() method, the width is to the left and the height is to up.
The following picture shows the output:

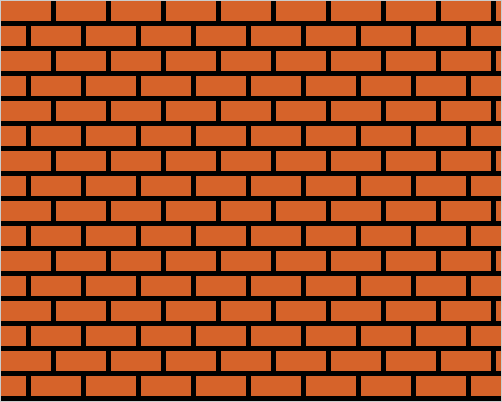
Using the JavaScript fillRect() to draw a brick wall
In this example, you’ll learn how to use the fillRect() method to draw a brick wall.
The following illustates the index.html file that has a canvas element:
<!DOCTYPE html>
<html lang="en">
<head>
    <meta charset="UTF-8">
    <meta name="viewport" content="width=device-width, initial-scale=1.0">
    <title>JavaScript Canvas fillRect</title>
    <link rel="stylesheet" href="css/style.css">
</head>

<body>

    <h1>JavaScript fillRect() - Draw a Brick Wall</h1>

    <canvas id="canvas" height="400" width="500">
    </canvas>


  <script src="js/app.js"></script>

</body>

</html>Code language: HTML, XML (xml)
In this example, the canvas will have the following style specified in the style.css file:
canvas {
    border: solid 1px #ccc;
    background-color: #000;
}Code language: CSS (css)
In the app.js file, define a function called drawWall() that draws a brick wall on a canvas:
function drawWall(ctx, canvasWidth, canvasHeight) {
    // define brick height and width, and spaces between them
    const bh = 20,
        bw = 50,
        space = 5;

    // calculate the rows and columns of the wall
    const rows = Math.ceil(canvasHeight / (bh + space));
    const columns = Math.ceil(canvasWidth / (bw + space));

    // draw columns
    for (let r = 0; r < rows; r++) {
        // draw rows
        for (let c = 0; c < columns; c++) {
            if (r % 2) {
                c == 0 ? ctx.fillRect(c * (bw + space), r * (bh + space), bw / 2, bh) :
                    ctx.fillRect(c * (bw + space) - bw / 2, r * (bh + space), bw, bh);
            } else {
                ctx.fillRect(c * (bw + space), r * (bh + space), bw, bh);
            }
        }
    }
}Code language: JavaScript (javascript)
The drawWall() function accepts a 2d drawing context and the height and width of the wall.
First, define the height (bh) and width (bw) of each brick and the space between two bricks:
const bh = 20,
      bw = 50,
      space = 5;Code language: JavaScript (javascript)
Second, calculate the number of rows and columns of bricks based on the dimension of the brick and the wall’s width and height:
// calculate the rows and columns of the wall
const rows = Math.ceil(height / (bh + space));
const columns = Math.ceil(width / (bw + space));Code language: JavaScript (javascript)
Third, draw bricks by using the fillRect() method. Use two for loops to draw bricks row by row.
// draw rows
for (let r = 0; r < rows; r++) {
    // draw columns
    for (let c = 0; c < columns; c++) {
        if (r % 2) {
            c == 0 ? ctx.fillRect(c * (bw + space), r * (bh + space), bw / 2, bh) :
                ctx.fillRect(c * (bw + space) - bw / 2, r * (bh + space), bw, bh);
        } else {
            ctx.fillRect(c * (bw + space), r * (bh + space), bw, bh);
        }
    }
}Code language: JavaScript (javascript)
Note that the first brick of the even row will have a width that equals to a half of the normal brick’s width.
The following picture shows the output:
And here is the link shows the demo.
Summary
- Use the JavaScript
fillRect()to draw a filled rectangle that starts at(x,y)and has a specified width and height. - Use the
fillStyleproperty to set the fill style of the rectangle.