Summary: in this tutorial, you will learn about JavaScript form API: accessing the form, getting values of the elements, validating form data, and submitting the form.
Form basics
To create a form in HTML, you use the <form> element:
<form action="/signup" method="post" id="signup">
</form>Code language: HTML, XML (xml)
The <form> element has two important attributes: action and method.
- The
actionattribute specifies a URL that will process the form submission. In this example, the action is the/signupURL. - The
methodattribute specifies the HTTP method to submit the form with. Usually, the method is eitherpostorget.
Generally, you use the get method when you want to retrieve data from the server and the post method when you want to change data on the server.
JavaScript uses the HTMLFormElement object to represent a form. The HTMLFormElement has the following properties that correspond to the HTML attributes:
action– is the URL that processes the form data. It is equivalent to theactionattribute of the<form>element.method– is the HTTP method which is equivalent to themethodattribute of the<form>element.
The HTMLFormElement element also provides the following useful methods:
submit()– submit the form.reset()– reset the form.
Referencing forms
To reference the <form> element, you can use DOM selecting methods such as getElementById():
const form = document.getElementById('subscribe');Code language: JavaScript (javascript)An HTML document can have multiple forms. The document.forms property returns a collection of forms (HTMLFormControlsCollection) on the document:
document.formsCode language: JavaScript (javascript)To reference a form, you use an index. For example, the following statement returns the first form of the HTML document:
document.forms[0]Code language: CSS (css)Submitting a form
Typically, a form has a submit button. When you click it, the browser sends the form data to the server. To create a submit button, you use <input> or <button> element with the type submit:
<input type="submit" value="Subscribe">Code language: HTML, XML (xml)Or
<button type="submit">Subscribe</button>Code language: HTML, XML (xml)If the submit button has focus and you press the Enter key, the browser also submits the form data.
When you submit the form, the submit event is fired before the request is sent to the server. This gives you a chance to validate the form data. If the form data is invalid, you can stop submitting the form.
To attach an event listener to the submit event, you use the addEventListener() method of the form element as follows:
const form  = document.getElementById('signup');

form.addEventListener('submit', (event) => {
    // handle the form data
});Code language: JavaScript (javascript)
To stop the form from being submitted, you call the preventDefault() method of the event object inside the submit event handler like this:
form.addEventListener('submit', (event) => {
    // stop form submission
    event.preventDefault();
});Code language: PHP (php)
Typically, you call the event.preventDefault() method if the form data is invalid. To submit the form in JavaScript, you call the submit() method of the form object:
form.submit();Code language: CSS (css)Note that the form.submit() does not fire the submit event. Therefore, you should always validate the form before calling this method.
Accessing form fields
To access form fields, you can use DOM methods like getElementsByName(), getElementById(), querySelector(), etc.
Also, you can use the elements property of the form object. The form.elements property stores a collection of the form elements.
JavaScript allows you to access an element by index, id, or name. Suppose that you have the following signup form with two <input> elements:
<form action="signup.html" method="post" id="signup">
	<h1>Sign Up</h1>
	<div class="field">
		<label for="name">Name:</label>
		<input type="text" id="name" name="name" placeholder="Enter your fullname" />
		<small></small>
	</div>
	<div class="field">
		<label for="email">Email:</label>
		<input type="text" id="email" name="email" placeholder="Enter your email address" />
		<small></small>
	</div>
	<button type="submit">Subscribe</button>
</form>
Code language: HTML, XML (xml)
To access the elements of the form, you get the form element first:
const form = document.getElementById('signup');Code language: JavaScript (javascript)And use index, id, or name to access the element. The following accesses the first form element:
form.elements[0]; // by index
form.elements['name']; // by name
form.elements['name']; // by id (name & id are the same in this case)Code language: JavaScript (javascript)
The following accesses the second input element:
form.elements[1]; // by index
form.elements['email']; //  by name
form.elements['email']; // by idCode language: JavaScript (javascript)
After accessing a form field, you can use the value property to access its value, for example:
const form = document.getElementById('signup');
const name = form.elements['name'];
const email = form.elements['email'];

// getting the element's value
let fullName = name.value;
let emailAddress = email.value;Code language: JavaScript (javascript)
Put it all together: signup form
The following illustrates the HTML document that has a signup form. See the live demo here.
<!DOCTYPE html>
<html lang="en">
	<head>
		<title>JavaScript Form Demo</title>
		<meta name="viewport" content="width=device-width, initial-scale=1.0" />
		<link rel="stylesheet" href="css/style.css" />
	</head>
	<body>
		<div class="container">
			<form action="signup.html" method="post" id="signup">
				<h1>Sign Up</h1>
				<div class="field">
					<label for="name">Name:</label>
					<input type="text" id="name" name="name" placeholder="Enter your fullname" />
					<small></small>
				</div>
				<div class="field">
					<label for="email">Email:</label>
					<input type="text" id="email" name="email" placeholder="Enter your email address" />
					<small></small>
				</div>
				<div class="field">
					<button type="submit" class="full">Subscribe</button>
				</div>
			</form>
		</div>
		<script src="js/app.js"></script>
	</body>
</html>
Code language: HTML, XML (xml)
The HTML document references the style.css and app.js files. It uses the <small> element to display an error message in case the <input> element has invalid data.
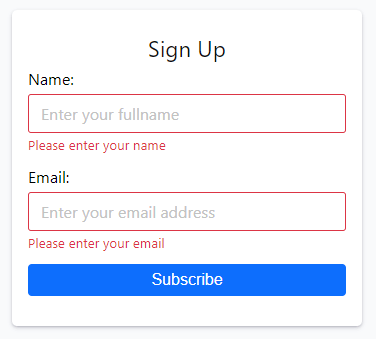
Submitting the form without providing any information will result in the following error:
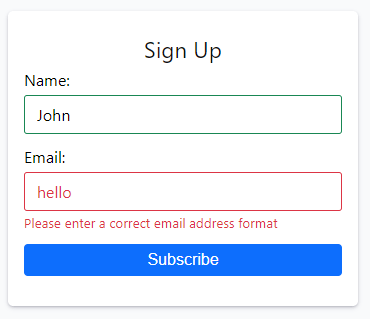
Submitting the form with the name but an invalid email address format will result in the following error:
The following shows the complete app.js file:
// show a message with a type of the input
function showMessage(input, message, type) {
	// get the small element and set the message
	const msg = input.parentNode.querySelector("small");
	msg.innerText = message;
	// update the class for the input
	input.className = type ? "success" : "error";
	return type;
}

function showError(input, message) {
	return showMessage(input, message, false);
}

function showSuccess(input) {
	return showMessage(input, "", true);
}

function hasValue(input, message) {
	if (input.value.trim() === "") {
		return showError(input, message);
	}
	return showSuccess(input);
}

function validateEmail(input, requiredMsg, invalidMsg) {
	// check if the value is not empty
	if (!hasValue(input, requiredMsg)) {
		return false;
	}
	// validate email format
	const emailRegex =
		/^(([^<>()\[\]\\.,;:\s@"]+(\.[^<>()\[\]\\.,;:\s@"]+)*)|(".+"))@((\[[0-9]{1,3}\.[0-9]{1,3}\.[0-9]{1,3}\.[0-9]{1,3}\])|(([a-zA-Z\-0-9]+\.)+[a-zA-Z]{2,}))$/;

	const email = input.value.trim();
	if (!emailRegex.test(email)) {
		return showError(input, invalidMsg);
	}
	return true;
}

const form = document.querySelector("#signup");

const NAME_REQUIRED = "Please enter your name";
const EMAIL_REQUIRED = "Please enter your email";
const EMAIL_INVALID = "Please enter a correct email address format";

form.addEventListener("submit", function (event) {
	// stop form submission
	event.preventDefault();

	// validate the form
	let nameValid = hasValue(form.elements["name"], NAME_REQUIRED);
	let emailValid = validateEmail(form.elements["email"], EMAIL_REQUIRED, EMAIL_INVALID);
	// if valid, submit the form.
	if (nameValid && emailValid) {
		alert("Demo only. No form was posted.");
	}
});

Code language: JavaScript (javascript)
How it works.
The showMessage() function
The showMessage() function accepts an input element, a message, and a type:
// show a message with a type of the input
function showMessage(input, message, type) {
	// get the <small> element and set the message
	const msg = input.parentNode.querySelector("small");
	msg.innerText = message;
	// update the class for the input
	input.className = type ? "success" : "error";
	return type;
}Code language: JavaScript (javascript)
The following shows the name input field on the form:
<div class="field">
	<label for="name">Name:</label>
	<input type="text" id="name" name="name" placeholder="Enter your fullname" />
	<small></small>
</div>Code language: HTML, XML (xml)
If the name’s value is blank, you need to get its parent first which is the <div> with the class “field”.
input.parentNodeCode language: CSS (css)Next, you need to select the <small> element:
const msg = input.parentNode.querySelector("small");Code language: JavaScript (javascript)Then, update the message:
msg.innerText = message;After that, we change the CSS class of the input field based on the value of the type parameter. If the type is true, we change the class of the input to success. Otherwise, we change the class to error.
input.className = type ? "success" : "error";Code language: JavaScript (javascript)Finally, return the value of the type:
return type;Code language: JavaScript (javascript)The showError() and showSuccess() functions
The the showError() and showSuccess() functions call the showMessage() function. The showError() function always returns false whereas the showSuccess() function always returns true. Also, the showSuccess() function sets the error message to an empty string.
function showError(input, message) {
	return showMessage(input, message, false);
}

function showSuccess(input) {
	return showMessage(input, "", true);
}Code language: JavaScript (javascript)
The hasValue() function
The hasValue() function checks if an input element has a value or not and shows an error message using the showError() or showSuccess() function accordingly:
function hasValue(input, message) {
	if (input.value.trim() === "") {
		return showError(input, message);
	}
	return showSuccess(input);
}Code language: JavaScript (javascript)
The validateEmail() function
The validateEmail() function validates if an email field contains a valid email address:
function validateEmail(input, requiredMsg, invalidMsg) {
	// check if the value is not empty
	if (!hasValue(input, requiredMsg)) {
		return false;
	}
	// validate email format
	const emailRegex =
		/^(([^<>()\[\]\\.,;:\s@"]+(\.[^<>()\[\]\\.,;:\s@"]+)*)|(".+"))@((\[[0-9]{1,3}\.[0-9]{1,3}\.[0-9]{1,3}\.[0-9]{1,3}\])|(([a-zA-Z\-0-9]+\.)+[a-zA-Z]{2,}))$/;

	const email = input.value.trim();
	if (!emailRegex.test(email)) {
		return showError(input, invalidMsg);
	}
	return true;
}Code language: PHP (php)
The validateEmail() function calls the hasValue() function to check if the field value is empty. If the input field is empty, it shows the requiredMsg.
To validate the email, it uses a regular expression. If the email is invalid, the validateEmail() function shows the invalidMsg.
The submit event handler
First, select the signup form by its id using the querySelector() method:
const form = document.querySelector("#signup");Code language: JavaScript (javascript)Second, define some constants to store the error messages:
const NAME_REQUIRED = "Please enter your name";
const EMAIL_REQUIRED = "Please enter your email";
const EMAIL_INVALID = "Please enter a correct email address format";Code language: JavaScript (javascript)
Third, add the submit event listener of the signup form using the addEventListener() method:
form.addEventListener("submit", function (event) {
	// stop form submission
	event.preventDefault();

	// validate the form
	let nameValid = hasValue(form.elements["name"], NAME_REQUIRED);
	let emailValid = validateEmail(form.elements["email"], EMAIL_REQUIRED, EMAIL_INVALID);
	// if valid, submit the form.
	if (nameValid && emailValid) {
		alert("Demo only. No form was posted.");
	}
});
Code language: JavaScript (javascript)
In the submit event handler:
- Stop the form submission by calling the
event.preventDefault()method. - Validate the name and email fields using the
hasValue()andvalidateEmail()functions. - If both name and email are valid, show an alert. In a real-world application, you need to call the
form.submit()method to submit the form.
Summary
- Use the
<form>element to create an HTML form. - Use DOM methods such as
getElementById()andquerySelector()to select a<form>element. Thedocument.forms[index]also returns the form element by a numerical index. - Use
form.elementsto access form elements. - The
submitevent fires when users click the submit button on the form.