Summary: in this tutorial, you’ll learn about JavaScript form validation by building a signup form from scratch.
What is form validation
Before submitting data to the server, you should check the data in the web browser to ensure that the submitted data is in the correct format.
To provide quick feedback, you can use JavaScript to validate data. This is called client-side validation.
If you don’t carry the client-side validation, it may cause a bad user experience. In this case, you may feel a noticeable delay because it takes time for the form data to transfer between the web browsers and the server.
Unlike the client-side validation that performs in the web browser, the server-side validation is performed on the server. It’s critical always to implement the server-side validation.
The reason is that client-side validation is quite easy to bypass. Malicious users can disable JavaScript and submit bad data to your server.
In this tutorial, you’re going to focus on the client-side validation only.
Client-side validation options
When it comes to client-side validation, you’ll have two options:
- JavaScript validation: you develop the validation logic using JavaScript. Or you can use a library to do so.
- Built-in form validation: you can use the HTML5 form validation features. This validation has a better performance than JavaScript validation. However, it isn’t as customizable as JavaScript validation.
JavaScript validation
You will create a simple signup form with four input fields: username, email, password, and confirm password.
When you click the sign up without filling anything or filling incorrect data format, the form will show error messages:
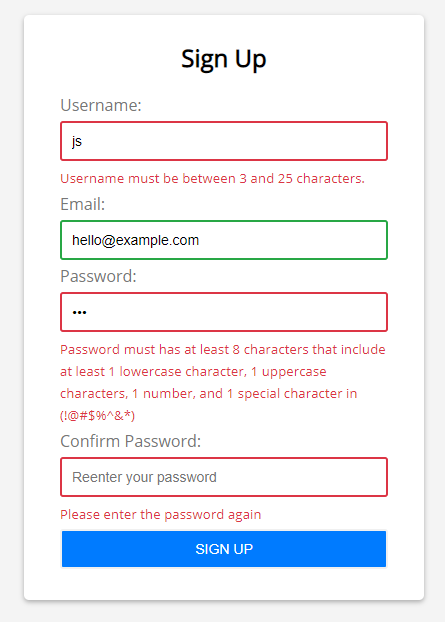
You’ll validate the following:
- Username cannot be blank and has at least 3 characters and cannot be longer than 25 characters.
- Email is mandatory and valid.
- Password has eight characters or longer. And it must contain 1 lowercase character, 1 uppercase character, 1 number, and at least one special character in this set (
!@#$%^&*). - The confirm password must be the same as the password.
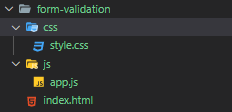
Create the project structure
First, create the form-validation folder that stores all the source code files of the project.
Second, create the js and css folders inside the form-validation folder.
Third, create the style.css in the css folder, the app.js in the js folder, and index.html directly in the form-validation folder.
The final project structure will look like this:
Build the HTML form
First, open the index.html file and enter the following code:
<!DOCTYPE html>
<html>
<head>
    <title>JavaScript Form Validation Demo</title>
    <link rel="stylesheet" href="css/style.css">
</head>
<body>

    <script src="js/app.js"></script>
</body>

</html>Code language: HTML, XML (xml)
In this HTML file, we place the style.css file in the head section and app.js file in the body section before the closing </body> tag.
Second, add the following HTML markup to create the signup form. The final index.html file will look like the following:
 <!DOCTYPE html>
<html>
<head>
    <title>JavaScript Form Validation Demo</title>
    <link rel="stylesheet" href="css/style.css">
</head>
<body>
    <div class="container">
        <form id="signup" class="form">
            <h1>Sign Up</h1>
            <div class="form-field">
                <label for="username">Username:</label>
                <input type="text" name="username" id="username" autocomplete="off">
                <small></small>
            </div>

            <div class="form-field">
                <label for="email">Email:</label>
                <input type="text" name="email" id="email" autocomplete="off">
                <small></small>
            </div>

            <div class="form-field">
                <label for="password">Password:</label>
                <input type="password" name="password" id="password" autocomplete="off">
                <small></small>
            </div>


            <div class="form-field">
                <label for="confirm-password">Confirm Password:</label>
                <input type="password" name="confirm-password" id="confirm-password" autocomplete="off">
                <small></small>
            </div>

            <div class="form-field">
                <input type="submit" value="Sign Up">
            </div>
        </form>
    </div>

    <script src="js/app.js"></script>
</body>
</html>Code language: HTML, XML (xml)
The notable thing about the signup form is that each field is wrapped in a div with the class form-field.
Each form field has three elements:
- A label
- An input field
- A
<small>element
You’ll use the <small> tag to show the error message to the users.
If an input field isn’t valid, we’ll make its border color red by adding the error class to the form-field element. It’ll look like this:
<div class="form-field error">
   <label for="username">Username:</label>
   <input type="text" name="username" id="username" autocomplete="off">
   <small></small>
</div>Code language: JavaScript (javascript)
If the value of an input field is valid, then we’ll make its border color green by adding the success class to the form-field element as follows:
<div class="form-field success">
   <label for="username">Username:</label>
   <input type="text" name="username" id="username" autocomplete="off">
   <small></small>
</div>Code language: JavaScript (javascript)
Check out the style.css for details of the.error and .success classes.
Select the form fields and add the submit event listener
In the app.js file, you’ll first use the document.querySelector() method to select the input fields and the form:
const usernameEl = document.querySelector('#username');
const emailEl = document.querySelector('#email');
const passwordEl = document.querySelector('#password');
const confirmPasswordEl = document.querySelector('#confirm-password');

const form = document.querySelector('#signup');Code language: JavaScript (javascript)
And then you attach the submit event listener to the form by using the addEventListener() method:
form.addEventListener('submit', function (e) {
    // prevent the form from submitting
    e.preventDefault();

});Code language: JavaScript (javascript)
In the event listener, you need to call the e.preventDefault() to prevent the form from submitting once the submit button is clicked.
Develop utility functions
Before validating the form, you can develop some reusable utility functions to check if:
- A field is required.
- The length of a field is between min and max.
- The email is in a valid format.
- The password is strong.
The following isRequired() function returns true if the input argument is empty:
const isRequired = value => value === '' ? false : true;Code language: JavaScript (javascript)The following isBetween() function returns false if the length argument is not between the min and max argument:
const isBetween = (length, min, max) => length < min || length > max ? false : true;Code language: JavaScript (javascript)To check the email is valid, you’ll use a regular expression:
const isEmailValid = (email) => {
    const re = /^(([^<>()\[\]\\.,;:\s@"]+(\.[^<>()\[\]\\.,;:\s@"]+)*)|(".+"))@((\[[0-9]{1,3}\.[0-9]{1,3}\.[0-9]{1,3}\.[0-9]{1,3}\])|(([a-zA-Z\-0-9]+\.)+[a-zA-Z]{2,}))$/;
    return re.test(email);
};Code language: JavaScript (javascript)
To check if a password is strong, which match a specified pattern, you’ll also use a regular expression:
const isPasswordSecure = (password) => {
    const re = new RegExp("^(?=.*[a-z])(?=.*[A-Z])(?=.*[0-9])(?=.*[!@#\$%\^&\*])(?=.{8,})");
    return re.test(password);
};Code language: JavaScript (javascript)
The following table illustrates the meaning of each part of the regular expression used to validate the password:
| Password RegEx | Meaning |
|---|---|
| ^ | The password starts |
| (?=.*[a-z]) | The password must contain at least one lowercase character |
| (?=.*[A-Z]) | The password must contain at least one uppercase character |
| (?=.*[0-9]) | The password must contain at least one number |
| (?=.*[!@#$%^&*]) | The password must contain at least one special character. |
| (?=.{8,}) | The password must be eight characters or longer |
Develop functions that show the error / success
The following showError() function highlights the border of the input field and displays an error message if the input field is invalid:
const showError = (input, message) => {
    // get the form-field element
    const formField = input.parentElement;
    // add the error class
    formField.classList.remove('success');
    formField.classList.add('error');

    // show the error message
    const error = formField.querySelector('small');
    error.textContent = message;
};Code language: JavaScript (javascript)
How it works.
First, get the parent element of the input field, which is the <div> element that contains the form-field class:
const formField = input.parentElement;Code language: JavaScript (javascript)Second, remove the success class and add the error class to the form-field element:
formField.classList.remove('success');
formField.classList.add('error');Code language: JavaScript (javascript)
Third, select the <small> element inside the form-field element:
const error = formField.querySelector('small');Code language: JavaScript (javascript)Notice that you use the formField.querySelector() instead of the document.querySelector().
Finally, set the error message to its textContent property of the <small> element:
error.textContent = message;The function that shows the success indicator is similar to the showError() function:
const showSuccess = (input) => {
    // get the form-field element
    const formField = input.parentElement;

    // remove the error class
    formField.classList.remove('error');
    formField.classList.add('success');

    // hide the error message
    const error = formField.querySelector('small');
    error.textContent = '';
}Code language: JavaScript (javascript)
Unlike the showError() function, the showSuccess() function removes the error class, adds the success class, and set the error message to blank.
Now, you can use the utility function above to check for each field.
Develop input field validating functions
You’ll develop four functions for validating values of the form fields:
1) Validate the username field
The following checkUsername() function uses:
- The
isRequired()function to check if the username is provided. - The
isBetween()function to check if the length of the username is between 3 and 25 characters. - The
showError()andshowSuccess()functions to show the error and success indicator.
The function returns true if the field passes the checks.
const checkUsername = () => {

    let valid = false;
    const min = 3,
        max = 25;
    const username = usernameEl.value.trim();

    if (!isRequired(username)) {
        showError(usernameEl, 'Username cannot be blank.');
    } else if (!isBetween(username.length, min, max)) {
        showError(usernameEl, `Username must be between ${min} and ${max} characters.`)
    } else {
        showSuccess(usernameEl);
        valid = true;
    }
    return valid;
}Code language: JavaScript (javascript)
2) Validate the email field
The checkEmail() function returns true if the email is provided and valid.
It uses the isRequired() and isEmailValid() functions for checking. And it uses the showError() and showSuccess() functions to provide feedback in case of error and success.
const checkEmail = () => {
    let valid = false;
    const email = emailEl.value.trim();
    if (!isRequired(email)) {
        showError(emailEl, 'Email cannot be blank.');
    } else if (!isEmailValid(email)) {
        showError(emailEl, 'Email is not valid.')
    } else {
        showSuccess(emailEl);
        valid = true;
    }
    return valid;
}Code language: JavaScript (javascript)
3) Validate the password field
The following checkPassword() function checks the password field if it is provided and match the required format:
const checkPassword = () => {

    let valid = false;

    const password = passwordEl.value.trim();

    if (!isRequired(password)) {
        showError(passwordEl, 'Password cannot be blank.');
    } else if (!isPasswordSecure(password)) {
        showError(passwordEl, 'Password must has at least 8 characters that include at least 1 lowercase character, 1 uppercase characters, 1 number, and 1 special character in (!@#$%^&*)');
    } else {
        showSuccess(passwordEl);
        valid = true;
    }

    return valid;
};Code language: JavaScript (javascript)
4) Validate the confirm password field
The checkConfirmPassword() function checks if the confirm password is the same as the password.
const checkConfirmPassword = () => {
    let valid = false;
    // check confirm password
    const confirmPassword = confirmPasswordEl.value.trim();
    const password = passwordEl.value.trim();

    if (!isRequired(confirmPassword)) {
        showError(confirmPasswordEl, 'Please enter the password again');
    } else if (password !== confirmPassword) {
        showError(confirmPasswordEl, 'Confirm password does not match');
    } else {
        showSuccess(confirmPasswordEl);
        valid = true;
    }

    return valid;
};Code language: JavaScript (javascript)
Modifying the submit event handler
Now, you can use the functions that validate the input fields in the submit event handler:
form.addEventListener('submit', function (e) {
    // prevent the form from submitting
    e.preventDefault();

    // validate forms
    let isUsernameValid = checkUsername(),
        isEmailValid = checkEmail(),
        isPasswordValid = checkPassword(),
        isConfirmPasswordValid = checkConfirmPassword();

    let isFormValid = isUsernameValid &&
        isEmailValid &&
        isPasswordValid &&
        isConfirmPasswordValid;

    // submit to the server if the form is valid
    if (isFormValid) {

    }
});Code language: JavaScript (javascript)
How it works:
- First, call each individual function to validate username, email, password, and confirm password fields.
- Second, use the
&&operator to determine if the form is valid. The form is valid only if all fields are valid. - Finally, submit data to the server if the form is valid specified the
isFormValidflag. Note that submitting form data to the server isn’t covered in this tutorial.
Now, you can open the index.html file, enter some values and click the submit button to test it.
Add Instant feedback feature
The form only shows the error or success when you click the Sign Up button.
To provide instant feedback, you can attach an event listener to the input event of each field and validate it.
It’s even better to use the event delegation so that you attach the input event listener to the form and validate each field based on the current field id, like this:
form.addEventListener('input', function (e) {
    switch (e.target.id) {
        case 'username':
            checkUsername();
            break;
        case 'email':
            checkEmail();
            break;
        case 'password':
            checkPassword();
            break;
        case 'confirm-password':
            checkConfirmPassword();
            break;
    }
});Code language: JavaScript (javascript)
If you open the index.html and enter some data, you’ll see that the form shows the feedback either error or success instantly.
Also, you improve the performance of the form by using the debouncing technique.
Technically, you’ll wait for the users to pause the typing for a small amount of time or stop typing before validating the input.
For the detail of the debouncing technique, check it out in this tutorial.
The following illustrates the debounce() function:
const debounce = (fn, delay = 500) => {
    let timeoutId;
    return (...args) => {
        // cancel the previous timer
        if (timeoutId) {
            clearTimeout(timeoutId);
        }
        // setup a new timer
        timeoutId = setTimeout(() => {
            fn.apply(null, args)
        }, delay);
    };
};Code language: JavaScript (javascript)
Now, you can pass the input event handler to the debounce() function to debounce it:
form.addEventListener('input', debounce(function (e) {
    switch (e.target.id) {
        case 'username':
            checkUsername();
            break;
        case 'email':
            checkEmail();
            break;
        case 'password':
            checkPassword();
            break;
        case 'confirm-password':
            checkConfirmPassword();
            break;
    }
}));Code language: JavaScript (javascript)
If you enter data to a form field to trigger the input event, you’ll see that the error or success message will have a bit of delay.
The following shows the complete app.js file:
const usernameEl = document.querySelector('#username');
const emailEl = document.querySelector('#email');
const passwordEl = document.querySelector('#password');
const confirmPasswordEl = document.querySelector('#confirm-password');

const form = document.querySelector('#signup');


const checkUsername = () => {

    let valid = false;

    const min = 3,
        max = 25;

    const username = usernameEl.value.trim();

    if (!isRequired(username)) {
        showError(usernameEl, 'Username cannot be blank.');
    } else if (!isBetween(username.length, min, max)) {
        showError(usernameEl, `Username must be between ${min} and ${max} characters.`)
    } else {
        showSuccess(usernameEl);
        valid = true;
    }
    return valid;
};


const checkEmail = () => {
    let valid = false;
    const email = emailEl.value.trim();
    if (!isRequired(email)) {
        showError(emailEl, 'Email cannot be blank.');
    } else if (!isEmailValid(email)) {
        showError(emailEl, 'Email is not valid.')
    } else {
        showSuccess(emailEl);
        valid = true;
    }
    return valid;
};

const checkPassword = () => {
    let valid = false;


    const password = passwordEl.value.trim();

    if (!isRequired(password)) {
        showError(passwordEl, 'Password cannot be blank.');
    } else if (!isPasswordSecure(password)) {
        showError(passwordEl, 'Password must has at least 8 characters that include at least 1 lowercase character, 1 uppercase characters, 1 number, and 1 special character in (!@#$%^&*)');
    } else {
        showSuccess(passwordEl);
        valid = true;
    }

    return valid;
};

const checkConfirmPassword = () => {
    let valid = false;
    // check confirm password
    const confirmPassword = confirmPasswordEl.value.trim();
    const password = passwordEl.value.trim();

    if (!isRequired(confirmPassword)) {
        showError(confirmPasswordEl, 'Please enter the password again');
    } else if (password !== confirmPassword) {
        showError(confirmPasswordEl, 'The password does not match');
    } else {
        showSuccess(confirmPasswordEl);
        valid = true;
    }

    return valid;
};

const isEmailValid = (email) => {
    const re = /^(([^<>()\[\]\\.,;:\s@"]+(\.[^<>()\[\]\\.,;:\s@"]+)*)|(".+"))@((\[[0-9]{1,3}\.[0-9]{1,3}\.[0-9]{1,3}\.[0-9]{1,3}\])|(([a-zA-Z\-0-9]+\.)+[a-zA-Z]{2,}))$/;
    return re.test(email);
};

const isPasswordSecure = (password) => {
    const re = new RegExp("^(?=.*[a-z])(?=.*[A-Z])(?=.*[0-9])(?=.*[!@#\$%\^&\*])(?=.{8,})");
    return re.test(password);
};

const isRequired = value => value === '' ? false : true;
const isBetween = (length, min, max) => length < min || length > max ? false : true;


const showError = (input, message) => {
    // get the form-field element
    const formField = input.parentElement;
    // add the error class
    formField.classList.remove('success');
    formField.classList.add('error');

    // show the error message
    const error = formField.querySelector('small');
    error.textContent = message;
};

const showSuccess = (input) => {
    // get the form-field element
    const formField = input.parentElement;

    // remove the error class
    formField.classList.remove('error');
    formField.classList.add('success');

    // hide the error message
    const error = formField.querySelector('small');
    error.textContent = '';
}


form.addEventListener('submit', function (e) {
    // prevent the form from submitting
    e.preventDefault();

    // validate fields
    let isUsernameValid = checkUsername(),
        isEmailValid = checkEmail(),
        isPasswordValid = checkPassword(),
        isConfirmPasswordValid = checkConfirmPassword();

    let isFormValid = isUsernameValid &&
        isEmailValid &&
        isPasswordValid &&
        isConfirmPasswordValid;

    // submit to the server if the form is valid
    if (isFormValid) {

    }
});


const debounce = (fn, delay = 500) => {
    let timeoutId;
    return (...args) => {
        // cancel the previous timer
        if (timeoutId) {
            clearTimeout(timeoutId);
        }
        // setup a new timer
        timeoutId = setTimeout(() => {
            fn.apply(null, args)
        }, delay);
    };
};

form.addEventListener('input', debounce(function (e) {
    switch (e.target.id) {
        case 'username':
            checkUsername();
            break;
        case 'email':
            checkEmail();
            break;
        case 'password':
            checkPassword();
            break;
        case 'confirm-password':
            checkConfirmPassword();
            break;
    }
}));Code language: JavaScript (javascript)Summary
- What client-side validation is and the difference between the client-side vs. server-side validation.
- How to compose a form and combine JavaScript and CSS to validate input fields.
- How to use regular expressions to check if field values are in the correct format.
- How to use the event delegation technique.
- How to use the debouncing technique to improve the performance for the form validation.